Setting up the Lens Integration (Imagery and Notes)
Lens by Upstream Tech is a subscription service that combines a robust library of purchased geospatial imagery with advanced monitoring tools, allowing users to create in-depth analyses and comparisons over time. You must have at least a 'Lens - Standard' subscription to integrate Lens with Landscape.
There are two Lens Integrations available to use within Landscape: The Lens Notes integration and the Lens Imagery integration. Both integrations require the same setup, which is detailed below. Note however that while the Lens Notes integration is available with all standard Landscape subscriptions, the Lens Imagery integration is only available as an Add-On.
Step 1: Export a Boundary Shapefile
This step applies both to new Lens users and to existing ones who are using the Lens-Landscape integration for the first time.
Start with a View of 'All Properties.' At the very least, your results need to contain the following fields:
- Name
- Id
Then choose the option to 'Display as Map.'

Finally, click the Export button from the map that appears.
Exporting multiple record boundaries at once using Data Viewer
This short video explains how to quickly generate a shapefile of multiple records at once using Data Viewer
New Lens Users:
Share this shapefile with the Lens team when you're setting up your account and tell them you'd like it to be integrated with Landscape.
Existing Lens Users:
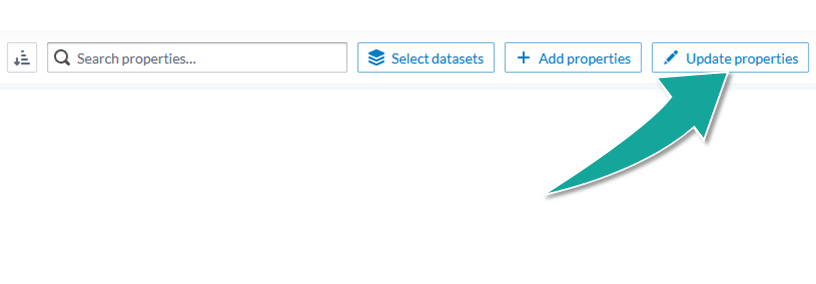
In Lens, perform a bulk update by selecting all properties and clicking on 'Update properties,' then uploading the .zip file of the exported Landscape portfolio shapefile. Lens will match the properties by geography. You'll be able to review the changes in a table and on the map before finalizing, and any notes and imagery within the new property boundaries will persist in Lens.
Once these steps are complete, ask the Lens team for an API key. You will need it in the next step.
Step 2: Edit Settings in Landscape
In Landscape, go to Settings > Integrations (you must be an Administrator to access Settings) and find the 'Upstream Tech' block. Click 'Enable' and enter the API key that the Lens team provided to you in Step 1.
You can click on the Integrations Settings button to confirm that 'src_Id' is the field that is being used for the synchronization. If the field is blank, type src_Id into the text box:

You'll also probably want to make sure that 'Automatically create new Issues from Lens notes' is unchecked (this is for special legacy users of the integration and should not apply to new integrations).
What is the src_Id? The 'src_Id' is a string of digits and numbers that is unique to each record in Landscape. When you import a shapefile with the 'src_Id' field in the attributes into Lens, Lens will see that field and know which record to place the data into in Landscape. Most issues with record synchronization are tied to this field either not being present in the Lens shapefile, or it being incorrect. The solution is then to re-export the boundary from Landscape and re-import it into Lens.
Step 3: Maintaining the Integration
Integration settings can be found in Settings > Integrations in the 'Upstream Tech' block. From here you can force a sync and access the integration settings. From settings you can see the Landscape record id field name (see above callout for more information). You probably want to keep this field as the default 'src_Id' since this field is automatically included in all exported record boundary shapefiles and is designed to work with this integration. There is also an option for 'Automatically create new issues from Lens notes' which should be left unchecked. This is an option specifically for legacy users of the integration.

Adding new records to Lens
To add a single, new synchronized record to Lens, export the boundary from Landscape and then import it into Lens when you create the new property there. To export a single record boundary, navigate to the record and click on the boundary on the map, then click on the 'export' button and select the shapefile option. You can also use the export button on the map toolbar, but the exported file must be the boundary file (not a 'Property Area', 'General Area' or 'Property Line' etc.). The exported Landscape boundary should already contain the 'src_Id' field and not require any editing.

If the property has already been created in Lens, then you'll just need to re-upload the old shapefile with the new one from Landscape by following these instructions.
Once the boundary is uploaded, the integration should begin working as soon as the next sync.