Introduction to Projects (article and video)
Landscape projects are a way of tracking any sort of complex due diligence process. A project is typically linked directly to one or more portfolio records, which are intended to house the actual data itself. You can think of a project as your shopping list, and a portfolio record as the fridge to house the things you actually get at the store. Projects were built with the property acquisition process in mind, but they can be used for many other purposes as well, including restoration projects and tracking your monitoring season.
The features unique to projects are:
- Budgets - How much you expect to spend on what vs. how much is actually spent.
- Funding expectations (and eventual disbursals) - Where is the funding coming from for this project? When were the funds disbursed, and how much actually changed hands?
- Custom Pre-made Task Lists - Ensure that staff are performing their due diligence when executing a complex project. Establish your acquisition checklist(s) in settings, and then add them to appropriate projects.
You can use all of these features in a project or just one. And, just like portfolio records, projects also have access to work, communications, contacts, and reports.
Here is a quick video overview of Projects. The rest of the article covers the concepts introduced here in more detail.
Project Details
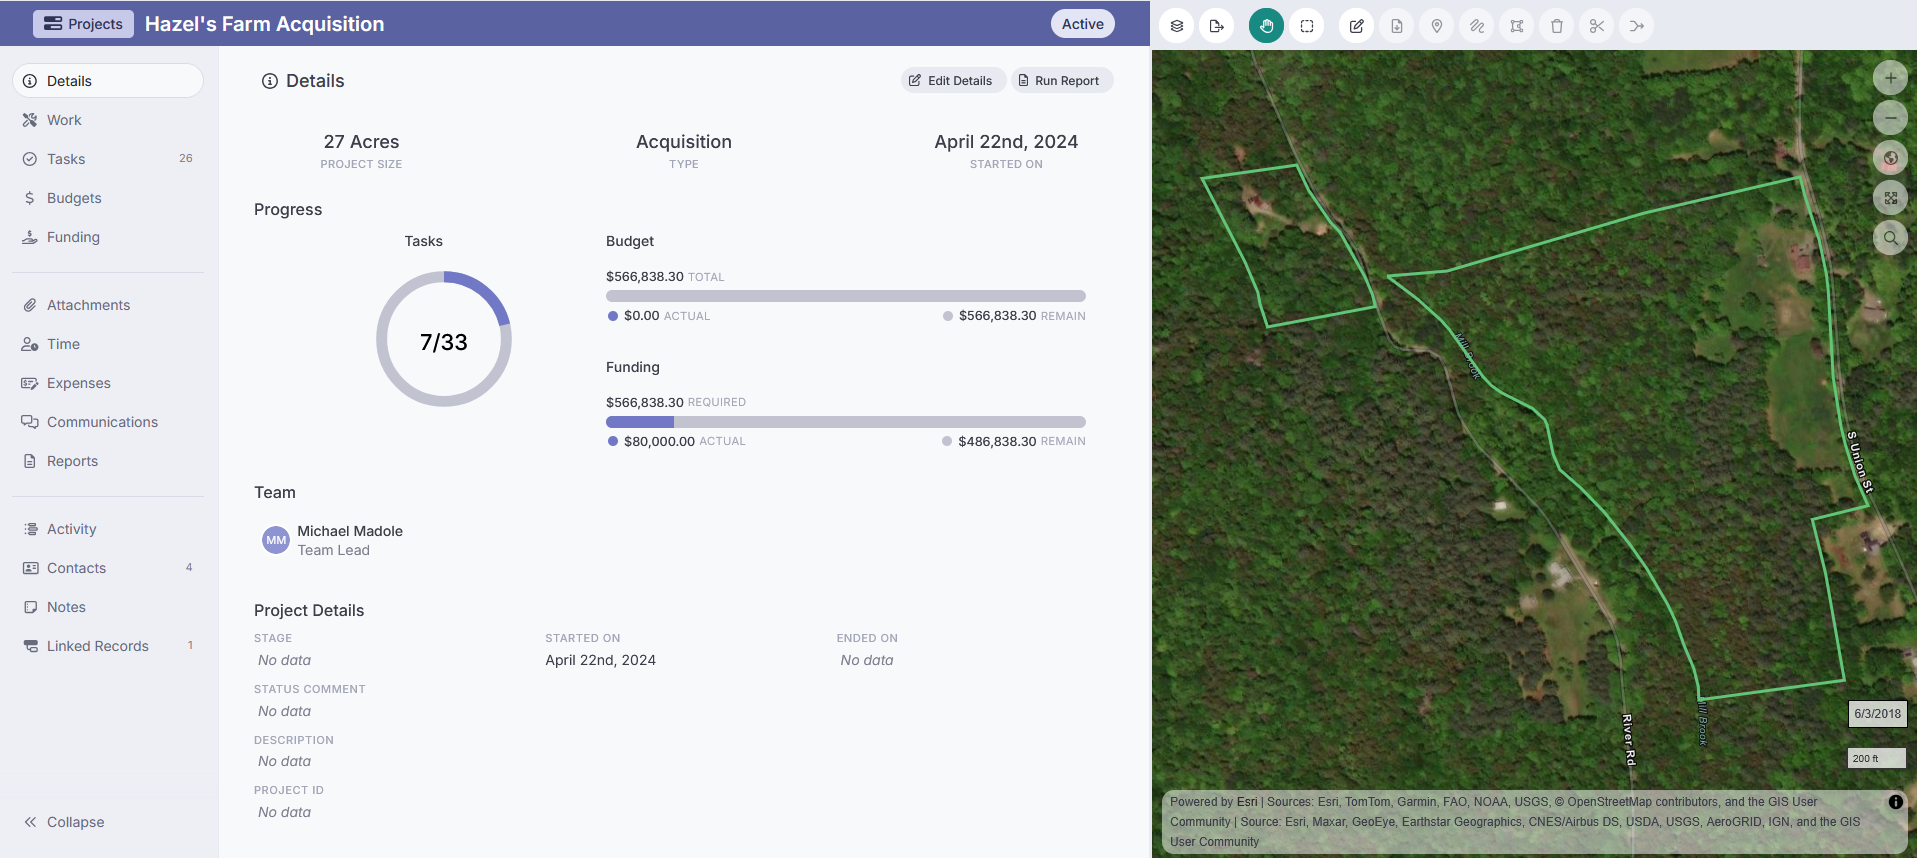
The project details page shows you all the summary information you need to know about your project, including the size, type, and when it was begun.
The 'Progress' section displays quick summary visualizations about your tasks, budget, and funding. 'Tasks' shows you how many tasks are completed out of the total number of assigned tasks. 'Budget' displays your actual expenses vs. your budgeted total, and 'Funding' displays how much funding you require (set by the total budget) vs. how much money you're expecting in total.
Further down the page, the 'Project Details' section allows you to set the stage, started-on date, ended-on date, and to write up a description of the project, as well as assign a project ID.
To edit any of these details, click on the 'edit details' button at the top of the page.
The left sidebar displays work items, tasks, budgets, funding, attachments, time, expenses, communications, reports, recent activity, contacts, notes, and linked records. In the sections that follow, this article goes into some detail about how each of those items can be used in a Project.
Contacts will display all contacts affiliated with the linked records, but you can also add contacts to the project itself.
Note that you can pin notes to the top of the page, just like with a portfolio record.
Project Maps
A project map will display the boundary of all linked records as 'Record Boundary', and the 'context layers' have the ability to display the work of those component records. You can also add custom project geography if you'd like. A blank project which is not affiliated with a particular record can still have project points, lines, and areas added to it.
Work
Work items in projects function very much the same as they do in portfolio records. However, in projects, Landscape expects those work items to be tied to records that are linked to the project. While you do have the ability to add unlinked work, this is not a recommended practice.
General Documents, Funding, Expenses, and Time Tracking
In addition to adding data to particular work items, you can also add general Attachments, Funding, Expenses, and Time Tracking to a project by using the Display buttons on the work page.

For example, you can choose 'Time' and then add hours to 'All Project Time Tracking' at the top of the page. Data added in this way will not be associated with an individual work item.
Budget
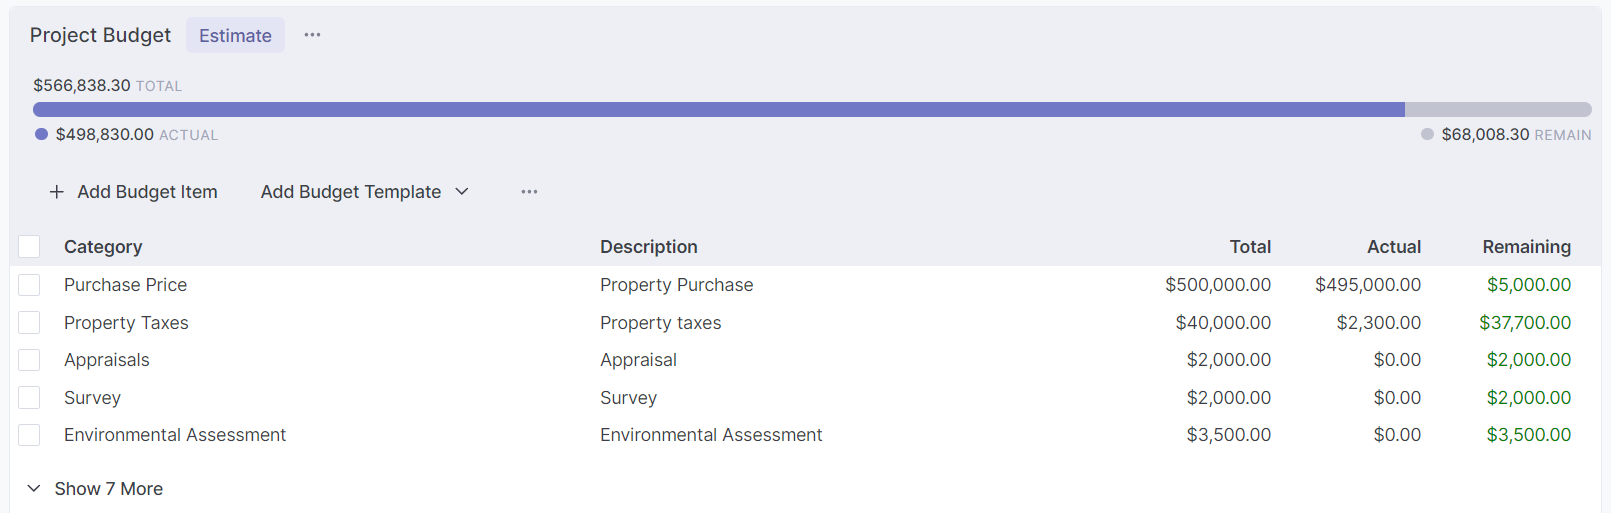
Budgets are for tracking planned vs. actual expenses. You can construct pre-designated budget templates in Settings > Projects > Budget Templates (must be an Admin to access settings). You can also create a budget from scratch within a project.
All budget items have a Category, Description, Quantity, Unit Name, and Unit Cost.
Description is for identifying the budget item within your budget, while Category is the cost category, and what ties the budget item to the eventual expense item. Cost categories can also be customized in settings. Quantity is the number of things you're budgeting for, Unit Name is the unit of measurement (Count, Hours, Miles, etc.), and Unit Cost is the cost per individual thing. Total cost (displayed in parentheses at the top of the record) is automatically calculated by multiplying the Quantity by the Unit Cost.

After adding an item to a budget, you can click on it to have its details displayed on the right side of the screen. Click on 'Add Expense' to add an expense that is then counted against the budget item. You can add multiple expenses to the same budget item.
Expenses created through work items in the project will also automatically be tied to the budget. In other words, if you create a work item for 'Appraisal' and attach an expense to it with the correct category, the link between that work item and the budget item will be created automatically and it will show up as an expense in the budget item.
For more on tracking budgets in projects, check out this article.
Tracking Labor
You can add 'time tracking' to individual work items and to the project in general. This is a way of tracking how many hours you or other staff or volunteers spent on a particular thing. However, these hours are simply for tracking time and do not have an associated cost with them. As a result, when you enter hours under 'time tracking', Landscape will ask if you also want to track the expense of that time, and will automatically filter out the 'Labor' category of expenses for you to choose from. It is this expense that is tracked against your budget.
You can also choose to track these hours as expenses only if you prefer.
Funding

From the funding page you can add funding sources, the amount you anticipate receiving from that funding source, information on the funding agreement (if one exists), as well as information on the amount of money that was finally disbursed from that funding source.
The way this is tracked is particularly useful for later creating queries on how much you've received from various funding sources over the years (see the Funding tab of the home screen).
In the screenshot above, you can see that we expected $80,000 from DCR, but received $79,345.
For more on funding, see this article.
Tasks and Task Lists
Tasks and task lists are at the heart of what projects are intended to help with. You can pre-create task lists in your account settings (Settings > Projects > Task Lists) and then apply one or more of those lists to your projects.

Once applied to a project, a task list can be customized by removing tasks that don't apply and creating new ones as they come up.
Task lists can be linked to a portfolio record, or to the project in general. If linked to the portfolio record, the tasks will also appear in the 'Tasks' tab of that record. Tying tasks to a record also facilitates the automatic creation of work, allowing you to enter details of the things you're checking off your list while you're checking them off.
Tasks
An individual task is just a to-do item. You can mark it as completed, assign it to a user, and set a timeline for it. Tasks generate email alerts to their owners. You can change these settings for your own account in 'Your Profile'.
Tasks can be linked to one or more work items. For example, if the task is 'Get the appraisal', then you can enter the actual appraisal work item directly from the task.
Taking that one step further, the 'required work category' and 'type' field of a task allow you to stipulate that a particular task cannot be completed unless the proper work is added. This is intended to be a way of ensuring that, at the end of the project, staff have uploaded all of the necessary work items to the correct records.
Tasks also have a description field if you need to provide more detail about what's needed, and you can add as many notes as you want to a task as well.
For an overview on tasks, you can look at this article. For more on tracking tasks and work, check out this article.
Communications
You can enter communications related to the project in the 'Communications' tab. You can enter as much content as you want to in the 'Content' section, including copy/pasting the contents of an email, and you can upload a document to the communication by utilizing the 'Documents' section. The user who is entering the communication is automatically captured in the 'Entered by', but this can be manually overridden if needed.
Note that you can also add communications to individual work items, and those will also appear in the communications tab.
Reports
The reports tab will display all reports run from within the project. For example, if you create and save a project status report, then it will appear here.
Creating a new project
There are three ways of creating a new project:
1) You can use the 'Create' button and select 'Project' to start one from scratch using the project wizard.
2) You can create one from a portfolio record by using the 'Projects' button in the left sidebar, or
3) You can create one or multiple projects from a 'portfolio record' view. This is used for creating a project that is linked to multiple records, or for creating multiple projects linked to multiple records. This workflow is covered in this article on using projects to track monitoring.
Deleting a project
Deleting a project will also delete all tasks associated with that Project. You can delete a project two different ways:
- For deleting a single project - From the 'Edit details' page of a Project, click on the trash can icon.
- For deleting multiple projects - From the 'All Projects' view, select the Projects you want to delete by selecting the check box to the left of the correct row, then click on the three dots in the view toolbar (next to 'Run Report'), then click on 'Delete Selected Results'.