How to stream map data with the GIS Add-On
This feature is only available as a paid add-on. If you want to purchase this add-on, please reach out to support@dendroyka.com.
Landscape has the ability to stream map data* to desktop or online GIS apps. This is done by first creating a View of the data you want to stream, generating the API URL, then inserting that URL into the application you're using.
Jump to...
*The Landscape GeoAPI can only stream out geographic data. It does not stream out photo data even if photos are associated with the geography.
API Safety
Streaming data out of Landscape creates a direct link to your account data. Anyone with access to that link can then have access to that data. Be sure you understand the system you are linking to and exercise caution when utilizing this feature.
You should also rotate your API key on a regularly scheduled basis from the API menu in Settings > Integrations. This will require that you get new API URLs using the method described below.
DO THIS FIRST: Get the API URL
Whichever GIS platform you are streaming Landscape data to, follow these steps first in order to find and copy the Landscape API URL.
Prerequisites:
- This feature requires that you've purchased the ArcGIS integration subscription add-on. This is true even if you are using the feature with a service other than Esri ArcGIS.
- You must be a user with the Standard interface to access the API URL.
Instructions:
- Navigate to Data Viewer, and open or create the View that you want to see. The fields that are visible in the View will be attached as attributes to the generated layer.
Read more about creating Views HERE.
- Select the option to display the results as a Map.
- Click on the three dots (next to 'Save As...') in the top toolbar and select Get Landscape API Url.
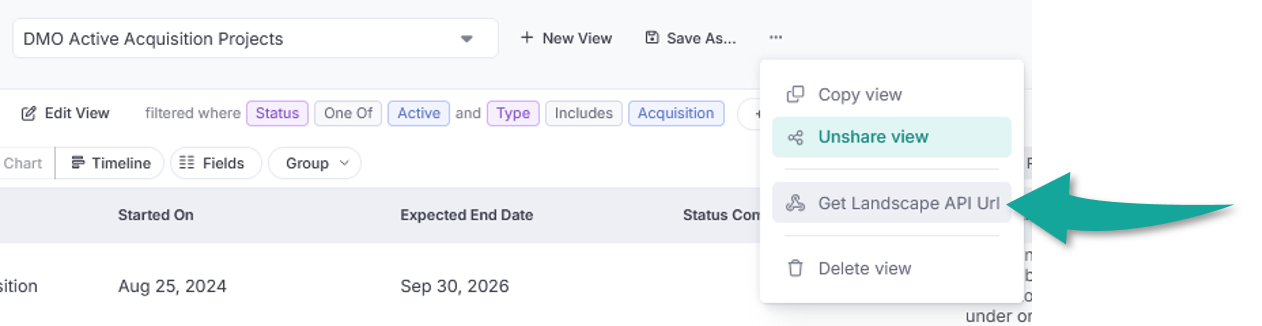
- Click the type of map feature data that you wish to stream out. This will copy the corresponding URL API to your clipboard.
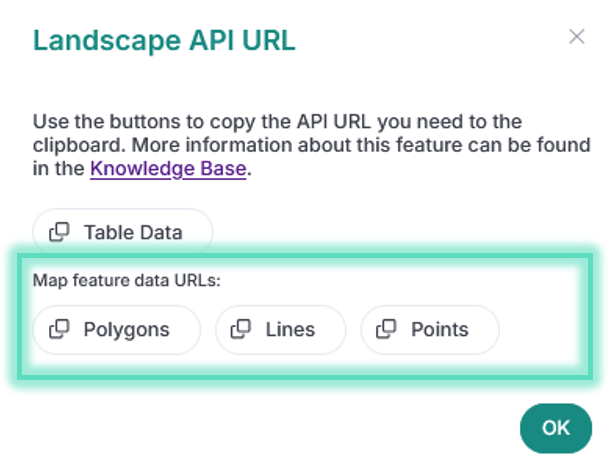
The link you copy will stay active until you rotate your API key, at which point you will need to complete steps 1 through 4 again to get a new link. Remember, it is good practice to rotate your API keys regularly.
Stream Landscape data to ArcGIS Online
You must complete steps 1 through 4 above before you can continue.
- In your AGOL map, click the plus (+) button to add a new layer. Select Add layer from URL.
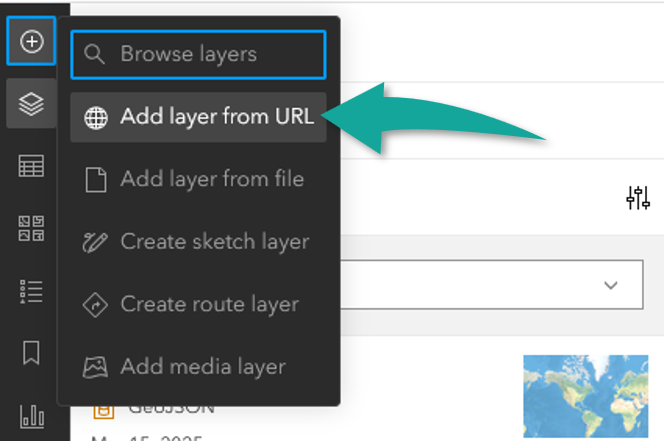
- Paste the Landscape API that you copied in step 4 into the URL field. If you plan to add more than one layer of Landscape data to the same map, go to step 7. Otherwise, skip to step 8.
- Add a unique parameter to the end of each URL. For example:

- Set the type to GeoJSON.
- Decide how you would like to add the file, then click Add to map.
The data from the View in Step 1 is now displayed in AGOL via the Landscape API. You can rename the layer, set file properties like layer styling, and run geospatial operations on the data.
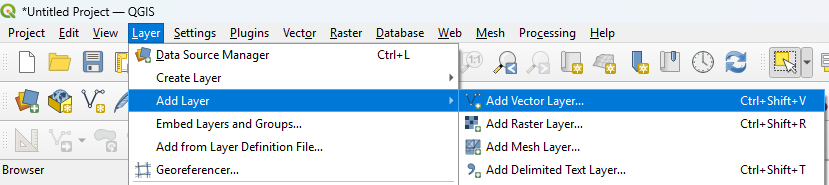
Stream Landscape data to QGIS
You must complete steps 1 through 4 above before you can continue.
- In your QGIS file/project, add a new vector layer.
- In the Data Source Manager | Vector options that appear, set the Source Type to Protocol: HTTP(S), cloud, etc. Set the Protocol Type to GeoJSON or HTTP/HTTPS/FTP.
- Paste the Landscape API that you copied in step 4 into the Protocol URI field, then click Add.
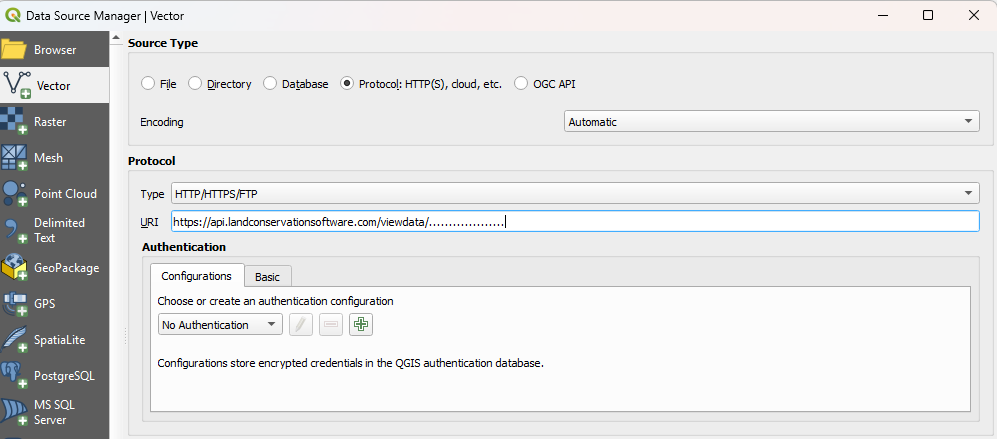
The data from the View in Step 1 is now displayed in QGIS via the Landscape API. You can rename the layer, set file properties like layer styling, and run geospatial operations on the data.
